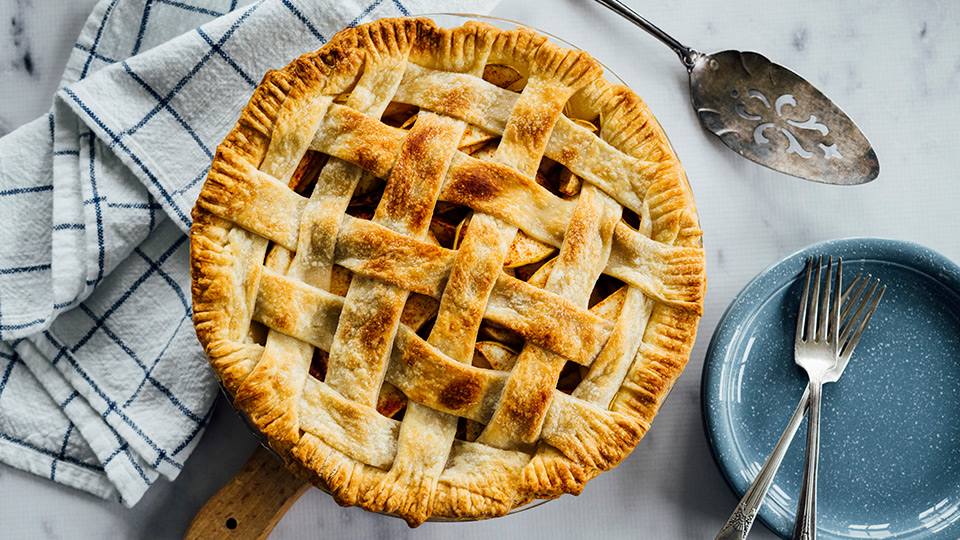
How to Make a Lattice Pie Crust
Making a homemade pie is a labor of love, but the results are worth it! No other dessert elevates the beauty of seasonal fruit, and a pie’s rustic charms are always welcome at a barbecue, potluck or any other gathering.
If you’re going to take the time to make pie, why not go the extra mile to craft a show-stopping lattice top crust? The effect — instantly recognizable and iconic as the summertime dessert —not only looks amazing, but helps the pie to cook evenly, releasing steam through the openings, and adds a few extra bites of flaky crust without weighing the slice down.
Here’s how to make a lattice pie at home:

Step 1. Make the Pie Crust and Filling
There are lots of recipes and methods for pie crust out there, but we’re partial to an all-butter dough for its wonderful texture and flavor.
The simplest method: Put 2 1/2 cups all-purpose flour into a food processor and add 1 teaspoon of salt. Dice 1 cup of super-cold unsalted butter into small pieces and add to the mix. Turn the food processor on and slowly, through the opening in the top, add ice-cold water, one tablespoon at a time, between 1/4 and 1/2 cup in total. Keep an eye on the dough, and when it starts to come together, where it holds together without crumbling, stop adding water. If the dough gets too sticky, add a tablespoon or two of flour to achieve the proper texture.
Remove the dough from the food processor and form it into a ball on a floured countertop. Divide the ball into two equally-sized pieces, form those into smooth dough balls with your hand, wrap them in plastic wrap and refrigerate for at least one hour.
Prepare a pie filling, according to your favorite recipe, and allow it to fully cool.

Step 2. Prepare the Bottom Half of the Crust
When you’re ready to assemble the pie, roll out one dough ball to a slightly larger circle than your pie, then place into the bottom of the pan. The dough should hang over the edge by about 1”. Put the pie pan back into the fridge.

Step 3. Cut the Lattice Strips
Roll out the other dough ball on a lightly floured surface to roughly the same size as the first piece. Chilled dough is easier to work with, so if the dough has softened while you rolled it out, place it back in the fridge for a few minutes. Then, using a pizza cutter or a sharp paring knife, cut the rolled-out dough into 1/2-inch strips; using a ruler helps to keep the strips even.

Step 4. Assemble the Pie
Pull the pie pan out of the fridge and pour the pie filling of your choice onto the bottom crust. Then, lay 5 or 6 strips of the crust across the top of the pie, spacing them out evenly, with about a 1/2” between each.
Fold back every other strip halfway, then lay one strip of dough the opposite direction. The strip should sit top of half of the strips; bring the folded back strips back over the perpendicular strip. This helps create the pretty over/under effect.

Pull back the alternate strips that didn’t get folded back in the last round. Lay a second strip of dough parallel to the first one, and bring the folded-back pieces back over top.
Repeat this process until the lattice pattern is complete across the top of the pie.
Bake the pie according to your recipe.

